Customizing the Django admin interface
Warning
The design of the admin has changed somewhat since this document was written, and parts may not apply any more. This document is no longer maintained since an official API for customizing the Django admin interface is in development.
Django’s dynamic admin interface gives you a fully-functional admin for free with no hand-coding required. The dynamic admin is designed to be production-ready, not just a starting point, so you can use it as-is on a real site. While the underlying format of the admin pages is built in to Django, you can customize the look and feel by editing the admin stylesheet and images.
Here’s a quick and dirty overview some of the main styles and classes used in the Django admin CSS.
Modules
The .module class is a basic building block for grouping content in the
admin. It’s generally applied to a div or a fieldset. It wraps the content
group in a box and applies certain styles to the elements within. An h2
within a div.module will align to the top of the div as a header for the
whole group.
Column Types
Note
All admin pages (except the dashboard) are fluid-width. All fixed-width classes from previous Django versions have been removed.
The base template for each admin page has a block that defines the column
structure for the page. This sets a class on the page content area
(div#content) so everything on the page knows how wide it should be. There
are three column types available.
- colM
- This is the default column setting for all pages. The “M” stands for “main”.
Assumes that all content on the page is in one main column
(
div#content-main). - colMS
- This is for pages with one main column and a sidebar on the right. The “S”
stands for “sidebar”. Assumes that main content is in
div#content-mainand sidebar content is indiv#content-related. This is used on the main admin page. - colSM
- Same as above, with the sidebar on the left. The source order of the columns doesn’t matter.
For instance, you could stick this in a template to make a two-column page with the sidebar on the right:
{% block coltype %}colMS{% endblock %}
Text Styles
Font Sizes
Most HTML elements (headers, lists, etc.) have base font sizes in the stylesheet based on context. There are three classes are available for forcing text to a certain size in any context.
- small
- 11px
- tiny
- 10px
- mini
- 9px (use sparingly)
Font Styles and Alignment
There are also a few styles for styling text.
- .quiet
- Sets font color to light gray. Good for side notes in instructions. Combine
with
.smallor.tinyfor sheer excitement. - .help
- This is a custom class for blocks of inline help text explaining the
function of form elements. It makes text smaller and gray, and when applied
to
pelements within.form-rowelements (see Form Styles below), it will offset the text to align with the form field. Use this for help text, instead ofsmall quiet. It works on other elements, but try to put the class on apwhenever you can. - .align-left
- It aligns the text left. Only works on block elements containing inline elements.
- .align-right
- Are you paying attention?
- .nowrap
- Keeps text and inline objects from wrapping. Comes in handy for table headers you want to stay on one line.
Floats and Clears
- float-left
- floats left
- float-right
- floats right
- clear
- clears all
Object Tools
Certain actions which apply directly to an object are used in form and
changelist pages. These appear in a “toolbar” row above the form or changelist,
to the right of the page. The tools are wrapped in a ul with the class
object-tools. There are two custom tool types which can be defined with an
additional class on the a for that tool. These are .addlink and
.viewsitelink.
Example from a changelist page:
<ul class="object-tools">
  <li><a href="/stories/add/" class="addlink">Add redirect</a></li>
</ul>

and from a form page:
<ul class="object-tools">
 <li><a href="/history/303/152383/">History</a></li>
 <li><a href="/r/303/152383/" class="viewsitelink">View on site</a></li>
</ul>

Form Styles
Fieldsets
Admin forms are broken up into groups by fieldset elements. Each form fieldset
should have a class .module. Each fieldset should have a header h2 within the
fieldset at the top (except the first group in the form, and in some cases where the
group of fields doesn’t have a logical label).
Each fieldset can also take extra classes in addition to .module to apply
appropriate formatting to the group of fields.
- .aligned
- This will align the labels and inputs side by side on the same line.
- .wide
- Used in combination with
.alignedto widen the space available for the labels.
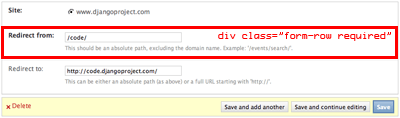
Form Rows
Each row of the form (within the fieldset) should be enclosed in a div
with class form-row. If the field in the row is required, a class of
required should also be added to the div.form-row.
Labels
Form labels should always precede the field, except in the case
of checkboxes and radio buttons, where the input should come first. Any
explanation or help text should follow the label in a p with class
.help.
Last update:
Nov 29, 2016